First Steps
This guide walks you through your first setup in Mind One. By the end, you’ll have a workspace with a working sheet and loaded data.
Before you start: make sure you’ve completed Access and Login.
The fast track: the First Steps wizard
The fastest way to get started is to upload an Excel or CSV file and let Mind One do the rest:
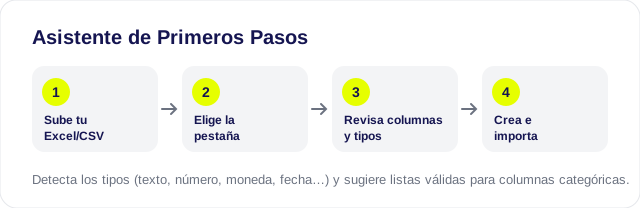
- Click the First Steps button in the sidebar (or drag a file onto the upload area on the Sheets page).
- Upload your
.xlsx,.xlsor.csvfile. If it has multiple tabs, choose which one to use. - The wizard detects the columns and suggests a data type for each one (text, number, currency, date…). Review the types and, if you want, enable the suggested value lists for categorical columns.
- Choose the workspace (new or existing) and confirm: the wizard creates the workspace, the lists, the sheet and imports the data, all in one step.
If you’d rather build it piece by piece, follow the manual steps:
Step 1: Create your first workspace
The workspace is the main container for organizing your data.
- From the sidebar, click Workspaces.
- Click Create workspace.
- Fill in the details:
- Name: a descriptive identifier (for example,
Customers). - Description: a brief explanation of its purpose.
- Icon (optional): pick an icon to identify it visually in the menu.
- Name: a descriptive identifier (for example,
- Confirm the creation.
The workspace will appear in the sidebar and in the workspace list.
Step 2: Create a sheet
Inside the workspace, create a sheet to store structured data.
Navigate to the workspace you just created.
Click Create sheet.
Fill in the basic details:
- Name: for example,
Key customers. - Description: the sheet’s purpose.
- Workspace: select the workspace created in the previous step.
- Name: for example,
Define the sheet’s fields:
Field Type Required Description nameText Yes Customer name emailEmail Yes Contact email countryText Yes Country of origin activeBoolean Yes Whether the customer is active signup_dateDate No Registration date Optionally, define cross-field validation rules (for example, if you have start/end date fields).
Confirm the creation.
Tip: start with a few fields. You can always add more later without affecting existing data.
Step 3: Load data
You can load data in three ways:
Manual editing
- Open the sheet.
- Use the spreadsheet-like interface to add records directly.
- Data is validated in real time against the defined rules.
- Save your changes.
Importing from Excel
- From the sheet, click Download template to get an Excel file with the correct structure.
- Fill in the template with your data.
- Click Import Excel and select the file.
- Choose the import mode:
- Replace: replaces all existing data.
- Append: adds the new records to the existing data.
- Mind One validates the data before applying the import. If there are errors, they’re shown so you can fix them.
Syncing from a data lakehouse (autosync)
If you have a connection configured (Snowflake, BigQuery, etc.), data can sync automatically. See the Connections section for more detail.
Step 4: Organize with groups
If you have multiple related sheets, group them together:
- From the sidebar, go to Groups.
- Click Create group.
- Give it a name and select the associated workspaces.
- Once created, you can assign sheets to the group from its detail view.
Step 5: Create a value list
If you need a reusable catalog of options (countries, categories, statuses):
From the sidebar, go to Value Lists.
Click Create value list.
Define a unique key (for example,
countries), a name and the values:Value Label Order ESSpain 1 MXMexico 2 COColombia 3 Save the value list. You can now link it to fields in your sheets so they appear as dropdown options.
Next steps
- Invite users: from Settings > Users, invite your team and assign them roles.
- Connect a data lakehouse: set up a connection to Snowflake, BigQuery or another system to sync data.
- Export data: download your sheets as Excel or via the API.
- Configure Billing: change your plan’s capacity from Account Settings > Billing.
To dig deeper into each feature, see the Configuration and Connectivity sections.